
The following article is from the 2022 Fall Shot Peener magazine.
by James Kernan | Materials Engineer / NadcapSM Auditor / Shot and Flapper Peening Instructor
I opened the PeenSolver Pro™ from my desktop and was impressed right from the start. It has a smooth interface showing the Process Settings, Almen Strips, Saturation Curve, and Intensity Verification all on the main page. I went to the Help tab on the top left and opened the Instructions. After starting to read, I realized it was good to get familiar with the PeenSolver, but to us shot and flapper peeners, the software is self-explanatory.
Some awesome points of the software include doing either Conventional Shot Peening or Rotary Flapper Peening, use of five (5) different Curve Type AMS2597 compliant algorithms to calculate the Saturation Curve, adding an error limit to highlight Arc Heights way off the Saturation Curve, and adding the Intensity Verification tolerance limit which will automatically tell you if you are within the tolerance limit (you don’t have to do the math or get your calculator out). You can also add as many locations as needed to the same file and view multiple Saturation Curves at once.
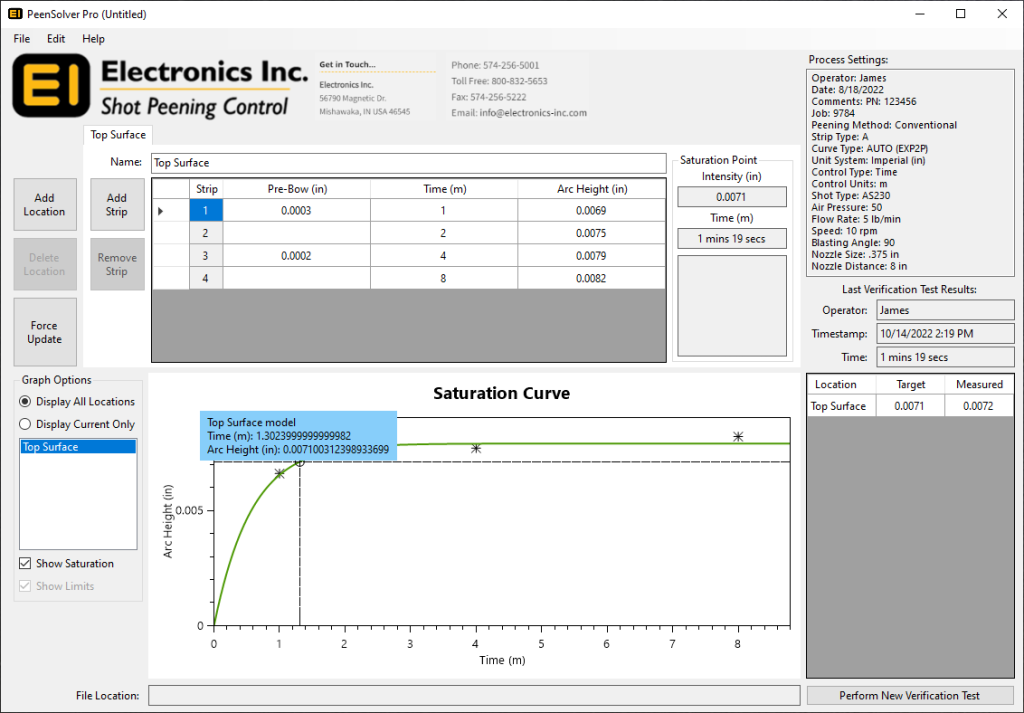
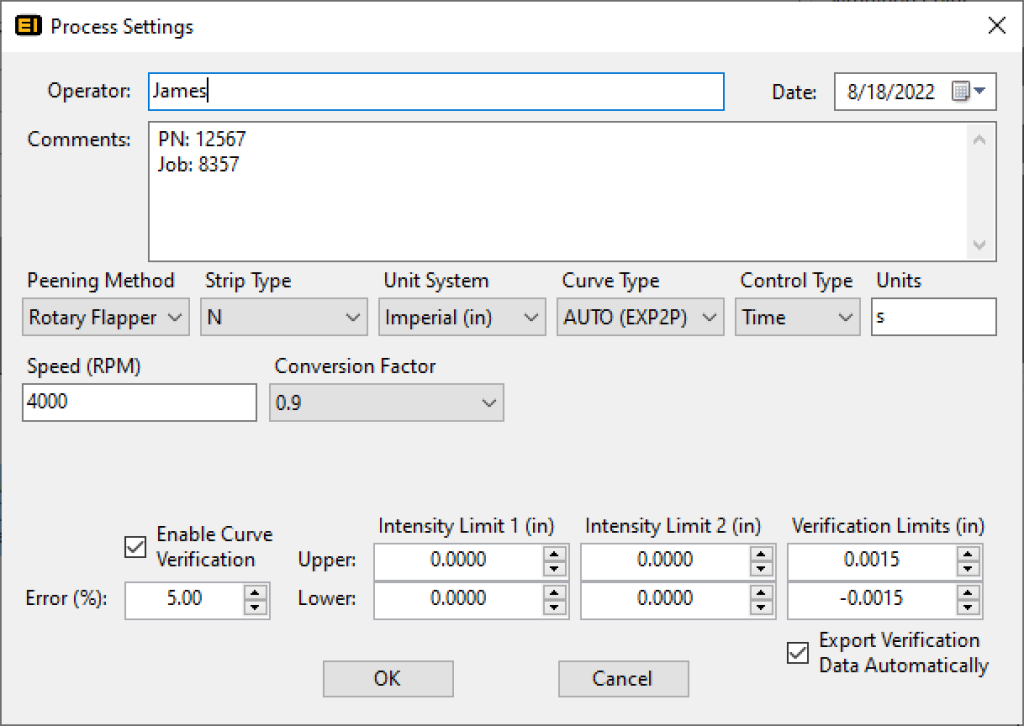
From the main page, I started with File > New and the Process Settings opens a new window. I entered the information for the Operator, put the Job and Part Number in Comments, peening method, Almen strip type and process parameters. The Process Settings default to a 5% Error Limit and standard +/- 0.0015 in Verification Limits. Clicked OK. The Process Settings showed up on the top right of the main page for reference.

On the main page, there is a Name box that defaults to Location 1. You can update the Name to whatever you want. I changed it to read Top Surface and then ran the shot peening process and started entering Arc Heights for Strip 1. Entered Pre-Bow, Time ran—which instantly populated the time at doubles for the other three strips—and then my Arc Height. Hit Tab and it automatically moved to Strip 2. Went through the same steps for the other three Almen strips. After entering the Strip 4 Arc Height, you can hit Enter or Tab and—BAM!—the Saturation curve is instantly displayed along with the Saturation Point Arc Height and Time. Another feature is that you can click on the curve or the arc heights on the Saturation Curve and the Arc Height and time will be displayed.
The next step is to set up the Intensity Verification process. Click on the bottom right button Perform New Verification Test. The pop-up box defaults to the Saturation Point Time and provides the Target Arc Height from the Saturation Curve. If the time at Saturation is not convenient for production, enter the time you want to run and the targeted Arc Height derived from the curve is instantly updated. Run the process and then enter the corrected Arc Height in the Measured box, then click on Save. Click File > Export > Verification Data and you will have a spreadsheet of all Verifications completed to date.
At this point, if you had only one Almen block, you have completed the Saturation Curve and Intensity Verification process steps. Click File > Save which saves the core XML file. Click File > Export > Screenshot and you have the entire process documented for your Part Process documentation.
During shot peening production, the user can open this same part file in PeenSolver Pro to validate the process and equipment settings as well as use the Verification Test button to enter the production Intensity Verification Arc Heights. Each time a verification is saved, the base Verification Excel file is updated with date and time, Operator, Peening Time, Target, and Measured Arc Heights. The Excel file record could easily be used for historical quality records. The continuous record can also be used to show deviations from the Targeted Arc Height over time which the user can translate into potential equipment or other maintenance.
The PeenSolver Pro has additional capabilities for Rotary Flapper Peening with both N and A Almen strips. The process is the same as described above for conventional shot peening except for selecting Rotary Flapper Peening, Almen Strip type and conversion factor in the Process Settings. The software includes automatic Adjusted Arc Height as required by AMS2590. You will save time and increase efficiency with the PeenSolver Pro by not having to do the peened Arc Height conversions using the correct AMS2590 table!
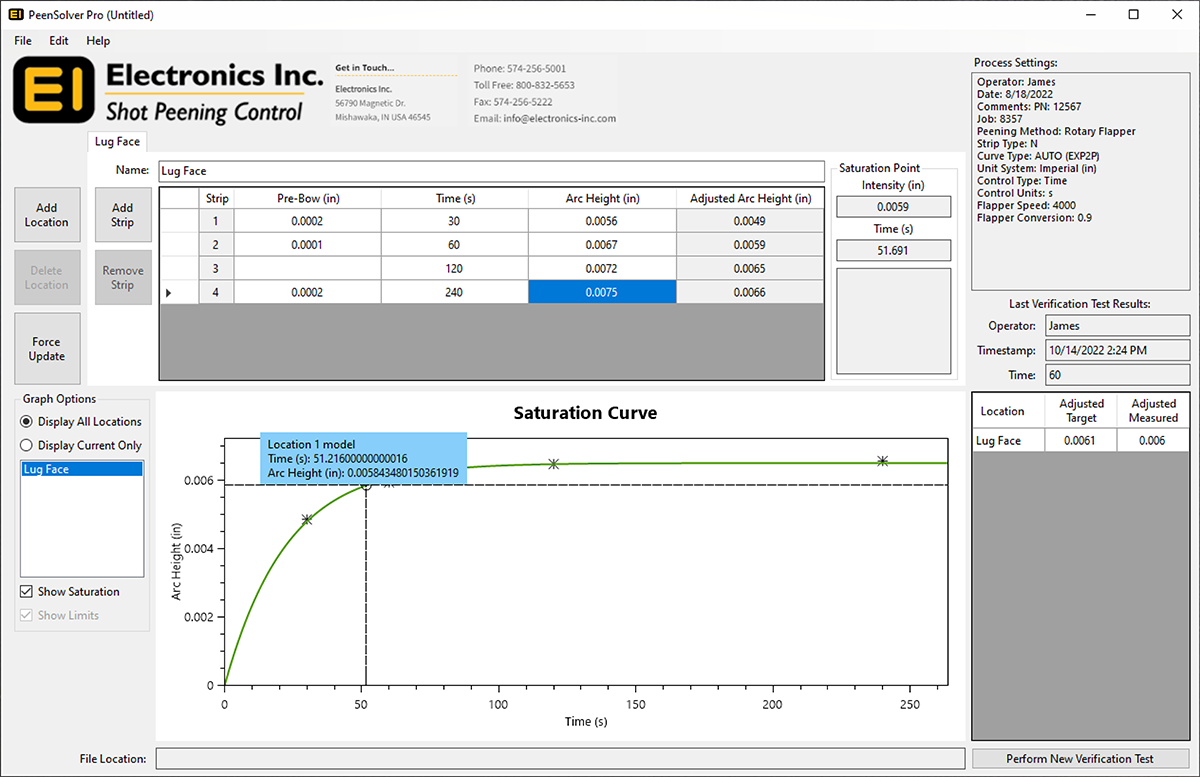
One last point that should be made is when you are developing a Saturation Curve from scratch, the PeenSolver Pro provides actionable information for the user. The software is remarkably quick to show the Curve and Saturation Point along with a Warning if it is a Type 2 curve, showing Arc Heights that are far from the calculated curve, and if the Saturation Point occurs prior to the first Arc Height or if a Saturation Point could not be found. You can easily add another strip after the first four with any time value and the curve will be recalculated. You can rerun strips and update the Arc Height for that time. You can also Display all Locations and all the Saturation Curves will populate the curve area. There are surely many other benefits that will save us time that we have yet to find.
I found the new PeenSolver Pro software very straightforward to use. The auto fill of time and the saturation curve is remarkable and the exceedingly fast Intensity calculation along with documentation of the shot peening Process Settings and Intensity Verification all in one place will make our work much easier. Thanks Electronics Inc.!